CÁCH CHỤP ẢNH PANORAMA 360 BẰNG FLYCAM
ENGLISH VERSION
How to Create Interactive 360 Degree Panoramas for Facebook

We’ve all seen those amazing interactive images on Facebook by now: beautiful 360 degree panoramas shot from a drone. Whether of a bustling city or a quiet country landscape, they all make us feel like we’re there. After doing some some research, I have found little help on this subject. In this article, I’ll be doing a step-by-step tutorial to show you how to accomplish this. There’s the paid/easy way, or the free/more work way. I’ll be going over both methods. Click the embedded post below to see what your final result will look like:
1. Obtain a Drone

You’re going to need something to take those aerial photos. I suggest a Phantom quadcopter. Here are the best options on Amazon:
- Phantom 3 Standard
- Phantom 3 Advanced
- Phantom 3 Professional
- Phantom 4
Also, a set of ND filters will get you better quality photos. It will prevent the images from being under or over exposed.
2. Download a Panorama Taking App
Download an app capable of automating the panorama taking process (however, it’s not difficult to take them manually). Litchi is a great app that works on almost all Phantom, Inspire, and Matrice drones. DronePan is another option, but is not compatible with as many quadcopters.
3. Take Pictures
- Open Litchi and connect to your drone. Fly to the height desired. I usually go around 300-400 feet.
- Click the menu to the top left and select Pano.
- Click the Pano Settings button in the bottom left of the screen.

- Set Type to Spherical 3 Rows.
- Set Photos per Row at 8 or greater.
- Press Start and give it a few minutes to capture all the photos.
- Import all of these images from your SD card to your computer.
You now have 2 ways to stitch your panorama, and give it the correct EXIF data (information that includes GPS coordinates, time, device, panorama info, etc.) to become an interactive panorama on Facebook: The Paid/Easy Way or The Free/More Work Way
Paid/Easy Way with Autopano

4. Purchase and Download Autopano
Autopano Pro or Autopano Giga can be purchased here from Kolor. Either one will do the job. However, Autopano Pro is about $110, while Autopano Giga is about $220.
5. Let the Program Do the Work
- Import photos by clicking Select Images. Select each photo or click the first one, hold shift, and then click the last one to select them all. Click Open.

- (Optional) If you want to add a sky in Photoshop after stitching make sure to change the settings to produce a full 360 panorama. Otherwise, skip this step (It will still produce a working interactive panorama, but it will prevent the interactive view from going above a certain point where the sky stops. This is okay for most). Go to the menuEdit>Settings>Panorma. Change Default Crop from Clamp to Panorama Content toMaximum Projection Range
- Click the Detect/stop all button at the bottom. It is a green button that looks like a play button. It will run for a minute or two, and then generate a stitched, flat panorama.
- Click the Render button (looks like a settings button). You can mess around with the export file, quality, and other things. I just leave mine at the default settings. Set your output folder and file name, and then hit Render.
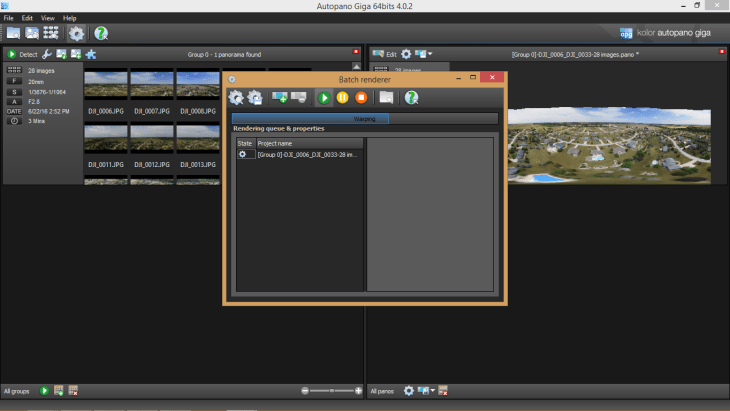
- After a few minutes, you will receive your final panorama.
5. (Optional) Add a Sky
You can take this panorama into Photoshop and add a sky in. I will have a tutorial how to do this in my next article so be sure to subscribe to my newsletter to get an update when it comes out (on the side bar or at the bottom of the page). It’s not hard to do a very plain, one color sky. However, adding in a sky with clouds and different colors can be tricky since you are working with a distorted image. Photoshop will keep the EXIF data, but many other photo editing programs will clear this data out. (You can purchase Photoshop by clicking the banner below).

6. Upload to Facebook
Autopano automatically attaches the correct EXIF data that Facebook is able to recognize as a panorama. When you upload the photo (upload like you would any other normal photo), it will instantly become a fully interactive photo on Facebook. You’re Done!
![]()
A symbol showing the way you’re facing should be visible
Free/More Work Way with Microsoft ICE and ExifTool
4. Download Microsoft ICE (Image Composite Editor)
You can get this free program here. It’s a great program, but not made for uploading interactive panoramas to Facebook. As you will see several steps later, you will need to add your own EXIF data and adjust the image size. AKA the “More Work Way”.
5. Stitch the Photos
- Open up Microsoft ICE and click New Panorama From Images at the top. Select each image or select first image, hold shift, and then select last image to select all of them. Click Open. The program will then open up with all of your images.
- Click Stitch at the top. After stitching, you will need to adjust your image so the horizon is completely flat and matches up with the middle line, as shown below. You can use your cursor to do this.

Horizon should be flat. You can adjust with the mouse.
- Hit Crop at the top. Leave all these settings at default (you can hit Autocomplete Image if you have missing, blank spots).
- Hit Export at the top. Make sure you are exporting as JPEG with whatever quality you desire. Click Export to disk.

- After a few seconds, you’ll have your stitched panorama. Now for the tricky part…
5. Adjust Image (Canvas) Size
- Open up your favorite image editing program. Just about anyone will be able to do this. Here’s a list of free ones.
- Adjust the size so the height is exactly half the size of the width. In Microsoft ICE, I believe the default panorama width is always 17408 pixels, meaning the height should be adjusted to 8704 (if for some reason it’s a different value just make sure you divide the width by 2 to get the height). Make sure you are adjusting the height of the image without actually stretching out your panorama. In other words, you’re just adjusting the size of the ‘Canvas’.
- To do this in Photoshop click on Image>Canvas Size.
- Make sure to move your panorama to the bottom of the canvas.

Make sure panorama is at the bottom of the canvas
- (Optional) Add a sky. You can easily brush in a solid color sky, or add a full blown sky with clouds. I will be writing a tutorial on this soon so be sure to subscribe (at the side or bottom of the page) to get notified when this new article comes out.
- Save photo as jpeg.
6. Download and Open ExifTool
- Download ExifToolGUI v5.16 from here and extract the archive.
- Download ExifTool from here and extract. Rename the extracted file to exiftool.exe and paste it to C:\Windows\
- Download the template (‘GPano2.ini‘) which will allow you to edit the Make and Model fields of the EXIF data in your image within ExifTool.
- Open up ExifToolGUI from the folder you had extracted it to.

- Go to the folder containing your panorama in the ‘Browse’ section on the left, and select the photo in the file list. Go to the menu and navigate to Program>Workspace definition file>Load and load ‘GPano2.ini’ (wherever you saved it from the above step). This file will allow you to change Make and Model in the Workspace properties under the Metadata section on the right of the interface.

- Click on Workspace in the Metadata section to the right. Change the values to match these (press enter after typing in each value in the text box):
Make sure to hit “Save” after changing all values.
- If for some reason your height and width are different, you can input those values as long as they follow the same pattern as above.
- Make sure to hit Save at the bottom when done!

7. Upload to Facebook
You’re panorama and Exif data are all set to go! When you upload the photo (upload like you would any other normal photo), it will instantly become a fully interactive photo on Facebook. You’re Done!
8. Enjoy Your Interactive 360 Aerial Panorama
It’s a lot of work, but well worth it. You now have a working interactive panorama shot from you drone on Facebook. Hundreds of likes and shares are coming your way, trust me.
Did this article help you out? Please share on social media and help others out too. Have some questions? Ask me in the comments below. Don’t forget to subscribe to get updates on more articles like this!